Monday 30 September 2013

Crafting disaster - a squirrel in the fog!

We've had a crafting disaster here today! It has been quite educational at times, but the end result has, so far, been complete failure. What I really need is someone out there to come up with a genius solution to our particular problem!

It began with, what I thought was, a brilliant idea for an interesting, child friendly Autumn make - a snow globe, but with falling leaves instead of falling snow. It does sound quite good, don't you think? There are loads of tutorials out there for DIY snow globes - the general idea seems to be jam jar, some kind of small plastic model, water, a few drops of glycerin and some glitter. The glitter being the snow, which we didn't want.

So I gathered together our supplies - with some leaves instead of the glitter (the leaves were ones that I'd coated with melted beeswax, I thought these would stand up to being in water better and for longer, but as you'll see leaves really didn't work, so this is completely immaterial!).
 

Our plastic model was a lovely and very Autumnal little squirrel with a nut - perfect! What could go wrong?!
 
The girls cut up the leaves into little pieces, still so far so good.


Now we experimented with different ways of sticking our squirrel to the lid of our jam jar. In one tutorial I'd read, they had used plasticine, this really didn't work for us. The squirrel fell off the plasticine and the plasticine fell off the lid and they both sank to the bottom of the jar. Then we tried some 'fimo' clay, a suggestion from a different tutorial. Fell off again. Another tutorial had simply hot glue gunned their plastic model to the lid so I tried this. And it seemed to work, even when wet.

This was our failed plasticine attempt.

Here's the squirrel successfully glue gunned on to the lid. I gave the lid just a quick rub with some sand paper first to help it stick

We got quite excited at this point and put it all together with a few drops of glycerine in the water as instructed. For a few moments it looked good, we shook it up and the leaves billowed around nicely in the water ...... and then they all floated up to the top rather than dropping gently and gracefully down to the lid at the base.

It was more like a leaf cloud!
We (I, really!) had completely failed to grasp the idea that whatever we put in there needed to sink, and unfortunately leaves seem to consistently float. You see, we're getting to the educational bit - floating and sinking experiments.

Venetia came up with the brilliant idea of cutting small, leaf shaped pieces of plasticine - we knew from our earlier failure sticking the squirrel on the lid that plasticine definitely sank. So she sliced up some little leaf shapes...


This looked promising - quite Autumn leaf like we thought and they definitely sank.


We got excited all over again, and tried it with the squirrel. And the plasticine really didn't live up to our expectations - no graceful billowing around, it just plumeted straight to the bottom like stones hailing down on the poor little, unsuspecting squirrel.

Undaunted, we tried to think of what else we might use - something that sinks, but not too hard and fast. Something that looks Autumnal and something that won't disintegrate too much in water. We tried acorns - the caps and the nut part - they both floated. We tried bits of pine cone - floated again. Bits of beech nut - both the shell and the nuts, from the garden, - both floated. Walnuts and pecans, from the cupboard - both floated. Pop corn kernels, again from the cupbard, - sank a bit too enthusiastically. Pieces of egg shell, left over from tea, sank quite gracefully but were so white on the inside they really didn't look Autumnal. And then lastly we tried some flaked almonds, again from the cupboard. They also sank quite gracefully and looked slightly better than the egg shells so, since we were at this point a little less enthusiastic and optimistic about the whole thing, we went with the almonds.

The first time we shook the jar, it sort of worked, it wasn't exactly the look we'd hoped for but the almonds did float around and then gently fell around the squirrels feet. But in the time it took me to turn on the camera to take a photo, the water had gone all cloudy, the almonds were apparently disintegrating rapidly in the water, and we now have a 'Squirrel in the fog' Globe.


We gave up for the day! Not necessarily forever, but to regroup and rethink ..... and appeal for any genius solutions from anyone reading this?????

By the way, we tried extra glycerin to try and improve the buoyancy on the plasticine attempt, and we did wonder about dyeing or painting the egg shells - but thought the colour would come off in the water. Perhaps paint and then varnish - but it seems a bit over the top for this make? And it feels to me like there should be a lovely, neat, solution out there, simple but clever, perhaps something glaringly obvious that we're overlooking???

So, help, please!

Back tomorrow, hopefully with something more successful! Sally.

Friday 27 September 2013

This moment

Here's a link to Soulemama's moment and here's mine...

{this moment}
A Friday ritual. A single photo - no words - capturing a moment from the week. A simple, special, extraordinary moment. A moment I want to pause, savor and remember. If you're inspired to do the same, leave a link to your 'moment' in the comments for all to find and see.
. . . . . . . . . .


And I know it's supposed to be 'no words', but for those of you who read yesterday's post with this mousey pumpkin in it - Maria did love it! In fact she was completely enchanted with it. There can't be too many better things than making something yourself and then seeing your little one love it!

We've got my brother and his family coming to stay this weekend so I'm going to skip the blog tomorrow and see you again Monday. Have a great weekend, I'm off to do a bit of tidying now - this picture I saw on Facebook is very appropriate today!

So true!

Sally.

Thursday 26 September 2013

Another pumpkin - but a very cute one!

I'm hoping you'll put up with one last variation on my wonky pumpkin - it is a very cute variation, and I think my favourite so far.

It was inspired by these pumpkins on Pinterest

Pumpkins with mice
Find it on my Autumn Board

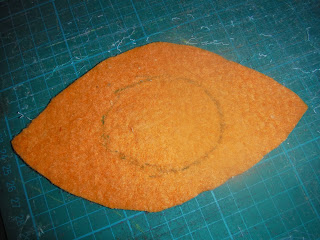
I thought it would be great to try a longer lasting, fabric version of these. So I needed to make a mouse hole for my pumpkin. I started out with a simple rounded triangle of my darker orange wool.


And then rolled it up into a cone shape...


I stitched around the bottom join on the machine - machine sewing is so much quicker - and then hand sewed a few stitches up the inside of the join just to make it good and secure. It also looked a bit long and pointy at this stage for what I wanted, so I machine stitched straight across about an inch up from my pointy end, to square it off and shorten it.


I cut out my 5 petal shapes, as per my instructions for the first pumpkin (here), and then drew around my mouse hole opening on one of these 'petals...


And then cut out this circle.


Next I blanket stitched the mouse hole on to my 'petal' in the circle I'd just created...


And then I just carried on as I have with the previous pumpkins, sewing wrong sides together for each of the pumpkin 'petals' so the seams are showing and sticking out, I just had to be careful not to catch the mouse hole on the inside as I sewed.


This is how it looked all sewn up. With this one I left a slight hole at the bottom as well as the top to help me stuff it from both ends. The stuffing was slightly more fiddly because I wanted to keep the mouse hole area hollowed out, but it worked pretty well if I kept a couple of fingers poked into the hole as I stuffed, and made sure I stuffed from both the ends and worked it around the hole tunnel.

Then I added a stalk and a leaf as before, and here it is...


A pumpkin with a ready made mouse hole. All it was waiting for was a mouse in need of a home...


And would you believe it, along came a mouse...


Had a bit of a sniff all over, and decided that he quite fancied this pumpkin, and moved in...


The mouse is a very straightforward finger puppet, so was really easy to put together. I made him in grey wool with a bit of pink and some emboidery for detail. He tucks in and out very easily, I think Maria is going to love this pumpkin! I love it too.

These pumpkins have been lots of fun to make and I'm already thinking we'll enjoy them year after year come Autumn time, just as we do Christmas decorations. I've made them all out of wool from recycled blankets, but if you don't happen to have quite the same obsession of collecting old wool blankets from charity shops (what's wrong with you?!) then I'm sure they would work with a reasonably good quality felt, ideally one with a good wool content.


So which is your favourite?

Back tomorrow with a photo, Sally.


Wednesday 25 September 2013

More thrifting...

I sat down this morning to crack on with my quilt, I was soooo close to finishing, just one little line of stitching to go ... and my sewing machine needle broke. And what was worse, I didn't have any others left. Aaaagh! After several rude words, and then a piece of chocolate cake to cheer myself up, I dashed off to the nearest town and a sewing shop to replenish my needle stocks. And here's what I came back with - can you see my needles right in the middle?!


I couldn't possibly not pop into a charity shop while I was out. So now I have yet another flower picture...


I know, I know, I have no more room for flower pictures, but look how beautiful and bright and colourful it is? And there were two very cute little tops which will cut up beautifully to use in patchwork...


And I thought this sturdy tray type thing would be just the thing for putting my current hand sewing project in, and carting it from room to room without losing all my bits - vital in fact, don't you think?


And as for this (very large) remnant - do I really need to explain myself? You surely already know I can't resist a retro print...


Then this cushion. I have plans for a seasidey room in the extension for my parents, and for some reason this cushion just looked like it would fit in perfectly with that.


And lastly this squirrel picture. I was thinking just yesterday, when I was in Autumn blogging mode, that one thing that was missing from my Autumnal decorations so far was something squirrely. So how fortunate was this?!


And how cute is he? He's already gone up on the wall in my corner from yesterday.


And talking of Autumn decorating, I was very excited today to find two additions to my Autumn linky thing. Lauren from The Thinking Closet has visited and linked up a couple of her projects, I especially love her pumpkin, have a look at how effective her curly tendrils are on there! I think I may be getting slightly pumpkin obsessed!

Anyway, since I did actually manage to remember the needles in amongst all my other exciting purchases, the quilt is now finally finished - and looking pretty good I think. But I'm afraid you can't see it quite yet. I'm really sorry but it belongs in a blog post with the other quilt I'm well on the way to finishing - so you've still got to wait. You'll just have to put up with a light weight thrifting blog today knowing that at some point in the nearish future there will be a heavy weight quilt blog coming up.

Got to go now, see you again tomorrow, Sally.

(And here's the Autumn linky thing so you can have a look at Lauren's lovely projects)


Tuesday 24 September 2013

More Autumn!

I've Autumnified another little corner of our home!


The cushion I made ages ago but it's just been sitting in one of my sewing piles unused. It's a replica of a shop bought one we have - you can never have too many owls! And the colours seemed perfect for Autumn so it finally got stuffed and put out on a chair.


Here's the rest of the corner...


A little cross stitch mouse - not made by me. Cross stitch is something I haven't so far tried. I found this little mouse in a charity shop, and he, again, seemed good to go for Autumn.


This was another charity shop find from quite a while back, and another cross stitch one. Can you see it has 'Autumn' embroidered at the bottom? Perfect! And lovely oak leaves and acorns in just the right Autumn colours. There were two pictures in the shop at the time, this one and a 'Spring' version as well, again in cross stitch and again with a bird. I bought them originally thinking that I'd put them up in my 'bird' area - ie the cat's room, but I never got round to it and now 'Autumn' seems just right here. Sadly, there were no 'Winters' or 'Summers' in the shop, perhaps whoever made them got a bit bored after two cross stitches. So I shall have to think of what I might want to hang in this space for those other two seasons.

These blocks really ought not to be in my Autumn space, I'm sure I could think of lots more appropriate things to put there instead. But they're very special to me and I can't bear to pack them away. I made them from a piece of driftwood that I found when I was walking on the beach with Sam last Autumn. It was really good to spend that time with just Sam, and it's a walk I'll always remember. The piece of wood was just big enough to make another set of blocks the same for Sam. And both have got the date, place and 'walking with Sam,' or 'walking with Mum,' burned on in smaller letters on the back. I'm not sure how much Sam appreciates them at the moment, but hopefully he'll keep them long enough until he is of a slightly more nostalgic age and does appreciate them even more.


I'd put my corner together to this extent when I realised what it really needed was, of course, another pumpkin! So I quickly whipped up another, smaller wool pumpkin (first one, with full pictures on how I made it here), this time with buttons as decoration.


And it is just what was needed!


We had a quick Autumn make at the weekend for one of our window areas too. Our garden is overflowing with apples at the moment, we are eating them like mad but I thought I'd try a making experiment with them too. I sliced a couple of them up thinly, laid them out on a plate and microwaved them for 30 seconds, then laid them out on a tea towel in the airing cupboard for a couple of days to dry. They worked better than I expected and we just threaded them together to make an apple dangly thingy!


Bit strange perhaps, but I kind of like it! Especially when the sun shines through them, the individual apple slices are surprisingly beautiful and each one unique.


I'm off back to crack on with my quilts again now, as ever it takes longer than I, optimistically, think to finish them. Don't forget to add your Autumn makes below too.


Back tomorrow, Sally.

Monday 23 September 2013

Patchwork Cushion Repair

I've had a wonderful weekend, but with not a lot of making happening. I did get a lovely, long swim in the river with the boys though - lovely, but cold! I think it could be our last river swim - unless possibly the sun shines next weekend and tempts us one, more, last time. The boys found it very funny that I came out red (better than blue mind you!) and I certainly needed my warm bath afterwards!

I did do a bit of sewing but it wasn't hugely exciting - I made a big, plain throw for a friend who loves the comfiness of her sofa but hates the look of it. There was a bit of her fabric left over for a few cushions too.


It's amazing how different a horrible sofa can look with a throw and new cushions, I have past experience of this!

And my other little bit of sewing was on this cushion.


It was a present for a good friend last year, and while I was round at her house last week I was deeply mortified to notice that it was coming apart a tiny bit in one place. Terrible workmanship!

I whisked it away to mend it - and photograph it for you too!

I'd forgotten just how lovely and bright it was! The front is slightly quilted, with a scrap of blanket behind, and I sewed 'S' shapes on each of the nine squares for the quilting lines, because it was for a 'Sarah'.

That's all you get for today - I have two big makes (ie quilts!) I'm cracking on with today that I'm hoping I'll have finished some time this week to share with you, and it feels like I have quite a backlog to get made after that too, so less writing, more sewing!

Back tomorrow, Sally.

Saturday 21 September 2013

Autumn Part 2 - Wonky Pumpkin

There are pumpkins all over Pinterest at the moment, I have a few on my Autumn board that I want to have a go at, but first I wanted to try and make one out of my favourite fabric - wool. With another of my favourites too - wool 'pennies'.

I cut these sort of petal shapes out a few days ago, and I've been looking at them since thinking they wouldn't work.


But last night I decided to try, and it actually came together surprisingly quickly and easily.


I just machine sewed the petals together, adding one after the other, with wrong sides flat together - I was sewing on the outside so the seams stick out and show.


Here it is just before I sewed on the last petal shape. For the last seam I left a little gap at the top so that I could poke the stuffing inside easily.


Here it is (above) all sewn and then (below) stuffed.


Now for the hand stitching. I cut out wool circles, in browns and a slightly lighter orange, and blanket stitched them on to each 'segment' of my pumpkin - you'll see them in place on the finished photos, I didn't stop to take pictures here, I was too cosily sitting snuggled under a quilt listening to the television at this point! Then I rolled up a small oblong of brown wool for a stalk and secured it with a few stitches, and then stitched down into the stuffing a few times to hold it in place - and it was go get a mug of hot chocolate and take a photo break here!


Nearly finished now. I just hand stitched up the top hole, going through the stalk a few times as I did to secure it a bit better - I have a feeling children will be picking up this pumpkin and twizzling it round by the stalk and probably throwing it around the room too, so it needed to be reasonably sturdy! (And there was a tiny gap where the 'petals' met at the bottom, not a visible hole but a hole where a finger could poke up and pull out the stuffing, so I stitched this up at the same time.) Last of all I cut out a leaf shape from some green wool, stitched a quick vein down the middle for detail, and then sewed it in place next to the stalk.

Here it is finished.


I'm really pleased with how it turned out. And it was very quick too - blanket stitching the pennies was the only part that took any time at all.


So it's going on my Autumn linky whatsit. I think I finally am starting to embrace Autumn, hope you are too and that you're in the mood for some Autumn crafting and making, please share your makes with us below.


I'll be back Monday, see you then, Sally.