Wednesday, 18 March 2015

Ho ho ho and on we sew - Clara and Nutcracker Dolls


Today I'm very happy to be hosting the 'Ho, ho ho and on we Sew' Link Party. 


Fiona at Celtic Thistle Stitches and Paula at Mud, Pies and Pins started this last year to try and make sure they were organised for Christmas, and it worked so well for them that they've continued it this year! You see, it's never too early to start your Christmas making - certainly not for me if I'm to stand any chance of being ready and relaxed come December!

And if you get making and link up, as well as being all prepared for Christmas in good time, you get to enter into a lovely giveaway. Thanks to the wonderful Ho, ho, ho sponsors...


Crafty Trimmings
http://www.patchworkelephant.com/

Logo Sew Hot

Plush Addict Logo Celtic Thistle Stitches
idth="320" />


Quilting Fabric at the Fat Quarter Shop


...there's a giveaway each month. And March's prize is 1m of this gorgeous Copenhagen Christmas fabric, from Patchwork Elephant.

Lots of lovely fabric and bits and bobs over there to browse through - including some beautiful Michael Miller fabric
You've got till the end of the month to add your makes (see the Link Up at the bottom), so there's still time to get going.

Right, back to my make. Last year the girls were both involved in an amazing ballet performance, and Maria's little section was an excerpt from 'The Nutcracker'. There was something about it that caught her imagination - I don't know whether it was the music or the costumes, the dancing itself or the little bits of the story she picked up on, but she became very interested in The Nutcracker. Probably a combination of all these things, and I think, in part at least, just the unusual name itself added to the interest. Anyway, we read different versions of the story lots, we listened to the music lots and Maria danced lots. Then, at Christmas I got Maria a musical Nutcracker as a present, and she loved that too...

When you wind him, he beats his drum and plays Nutcracker music.

I thought it would be lovely to give Maria a different 'Nutcracker' each year for Christmas, to build into her own special Nutcracker collection which will always remind us all of her very first ballet performance. And it occurred to me that this was also a perfect present to be lovingly homemade.

I decided I'd make a large 'Clara' doll with her own, small Nutcracker, so although it would have a Christmassy Nutcracker theme, it would also hopefully be something to play with in different ways all year round. I started off with a simple drawing of a Nutcracker...


And cut out 2 figures in this shape, just from some plain white fabric scraps. Then broke the picture down into its component parts...


And cut out these from lovely, recycled wool.


I sewed these on to my basic outline, fabric shape, adding thread detail...


Once they were both done I just sewed them together, section by section. The doll is quite small, and the wool is great for leaving edges raw, so I just sewed the 2 pieces wrong sides together, leaving the stitching on show - rather than having to turn fiddly, little sections inside out. Again because it's small, I stuffed a little bit at a time, finishing by sewing the top of the hat, rather than sewing the whole thing in one go and then having to stuff it all from one small gap.

Here the boots are being stuffed.
I added colour to the stitched, facial features with some colouring sharpies, and some gold details with ricrac and a button buckle, and there he was done.


Then on to Clara. Again a sketched out shape.

2 pieces for each of these body parts.

And some machine stitched detail...


Also some ballet shoes to sew onto the foot ends of both leg pieces.


For the back of the foot, I also tucked a thin ribbon in underneath before I sewed it on.

Just be sure to tuck your ribbons into the middle when you sew the leg pieces together, so you don't catch them with your stitching, and when you turn your legs out the ribbons are then on the outside as you want them.

The Clara doll is quite a bit bigger and made from cotton that will fray around the edges, so this one I did construct by sewing right sides together and then turning out. So the 2 leg pieces with their ballet shoes added, when sewn together, turned back out like this...

For all my Clara construction sewing, I went round at least twice to try and give it some strength and longevity on all the seams.

Here with arms as well, gently stuffed...


Some colour on this face - again with sharpies and some fabric crayons here too, ironed to make them colour fast...


Then I attached the arms to the back piece of the body, and pinned them towards the right side of the fabric, away from the edges I was about to sew...


Then sewed the front body piece on, over the top, careful not to catch those arms in the sewing.

The side you can see here is the inside out, wrong side, it's just the colours have come through very clearly, and my stitching is amazingly neat on the back here!
So here she is turned out, with her arms in place now.
The bottom edge is neatly ironed under here, ready for the final line of stitching coming up...


Stuff the head and body carefully, small pieces of stuffing are much the best I find, then pin the legs in place in your bottom, neatly ironed in, opening. Just needs sewing along this line now, and your basic doll is complete (though hairless!).


I converted an old, Summer top into Clara's nightie. It started out like this...


But with a few snips, and new seams...


It fitted her nicely.

I'm not sure it looks quite nightie-ish enough, so she may get another at some point.

And to finish, I just hand sewed some wool, along a side parting, for her hair.


Here she is with her Nutcracker. I think I'll probably put either some velcro or maybe a button on her hands to help her to hold him, here I cheated for the photo and her hands are just pinned together.


So there you go, I'm sure Maria will love them and it will be great to be able to pull them out of secret hiding place, storage come Christmas, all ready made - although very tempting to just give them to her now!


Even if a ballet dancing Clara with a Nutcracker isn't your thing, I do think a doll of any kind makes such a special, home made present. It feels so much more individual and personal when it's a one off, made especially for a particular child. And this style of doll really is very easy, and incredibly flexible to create different versions. If you need a more formal pattern and tutorial to follow then there's one over at Make it, Love it which looks pretty good, and easy to follow. Perfectly possible to get one made in time to link up before the month end even, and be in with a chance to win that lovely, Christmassy fabric! Or perhaps you have something different to link up below, I'm looking forward to seeing how you're getting organised for Christmas.

Sally.


PS Look out for all the 'Ho, ho ho' Link Ups each month on the 18th, here's a little timetable of all the wonderful bloggers hosting...

JanuaryCeltic Thistle StitchesFionahttp://celticthistlestitches.blogspot.com
FebruaryThreading My WayPamhttp://www.threadingmyway.com/
MarchWonky PatchworkSallyhttp://wonkypatchwork.blogspot.co.uk/
AprilSLIK stitchesBentahttp://slikstitches.com/
MayPractically PippyKarenhttp://practicallypippy.blogspot.co.uk/
JuneCharly & Ben's Crafty CornerRuthhttp://benandcharlyscorner.blogspot.co.uk/
JulyWeekend DoingsMarthawww.weekenddoings.blogspot.com

Patch the GiraffeChelseahttp://patchthegiraffe.blogspot.com/
AugustSunshine Through the RainDeborahhttp://sunshinethroughtherain-deborah.blogspot.co.uk/
SeptemberPractically PippyKarenhttp://practicallypippy.blogspot.co.uk/

Party of Eight: Our StoryGinahttp://partyofeightourstory.blogspot.co.uk/
OctoberElla and Nesta's Little RoomNestahttp://ellaandnesta.blogspot.co.uk/

Sandra Sews :)Sandrahttp://suddenlysandra.blogspot.co.uk/
NovemberRose & DahliaJoannehttp://rosedahlia.blogspot.co.uk/
DecemberMud, Pies and PinsPaulahttp://www.mudpiesandpins.com/


Friday, 13 March 2015

This Moment

Here's a link to Soulemama's moment, and here's mine, sunny day at the weekend meant a trip to the beach, so lots of photos ...

{this moment} ~ A Friday ritual. A single photo - no words - capturing a moment from the week. A simple, special, extraordinary moment. A moment I want to pause, savor and remember. If you're inspired to do the same, leave a link to your 'moment' in the comments for all to find and see.
. . . . . . . . . . 


Monday, 9 March 2015

Daily creative, sewing practice.

I've been steadily carrying on with my wool pennies over the last couple of months. 


I've tried to make sure I sewed at least a square a day, sometimes it's been quite a few more and other times I've skipped it completely. But it's been the closest thing I've had to a daily sewing ritual. 


Some squares have a very simply sewn circle, whilst others have something a little more elaborate or creative.

There's one in there which was influenced by the beautiful, starry nights we've had. And there's a not hugely effective butterfly down in the corner, as well as a sunshine circle.

I really like that they differ according to the mood I was in at the time, or any inspiration that I'd found around me.

Difficult to see here - but a smiley face up there, and top left was after time spent by the sea.
I think it's no surprise that those circles that are more elaborate or creative generally came further into my period of sewing. It felt like I was warming up creative muscles as I worked on these, I think I've got enough done now but by the end I had so many ideas for different stitching designs that I didn't get to use.

The feather in the centre is one of my favourites,  then there's an elephant up top and the little birdy to the side.
I've really enjoyed making them and reaching the end of the making left me wanting a new project along similar lines. A small, daily, creative exercise, ideally involving sewing, that would build into something bigger over time.  

There have also been a couple of very interesting blog posts I've read over this same period that have added to this itch to have some daily creative practice - Yvonne over at Quilting Jetgirl on Creativity and Time (great section on children and creativity in there too), and several posts over at Ann Wood Handmade. A few years ago Ann set herself the challenge of making a cardboard horse a day, until she had 100.


You can find her finishing post here, with more lovely photos and a video. 

You can also find her pattern and a tutorial for making them here.
As much as she herself wondered initially what she was going to do with them, I think they're gorgeous, and can completely understand how it became a very valuable daily, creative exercise. Just recently she's written an interesting post here about starting a daily practice of keeping a sketchbook.

So the stars were all aligned! I became set on finding my own version of a daily, creative practice. I'm hand sewing lots of yoyos at the moment, hopefully for a future quilt in my head, but I'm not finding that's getting any creative juices flowing. It is relaxing hand sewing however, so I began to think about my new creative practice being machine based instead. And what I've settled on is a fish a day!

I've cut out lots of small oblongs of sea coloured fabrics and stashed them in a little box.


And I'm going to sew a fish on to at least one a day (I'm not planning on beating myself up if I don't manage it for whatever reason every now and then, but the aim is very much daily). I'm thinking most of them will be simple, raw edge applique, with or without some machine embroidery, but that's completely open to change as I go along. When I feel like I have enough I'll sew them all together into a quilt (this is as much about the process of the daily making, but I do like it when there's an end purpose as well as process!). 

Here are my fish so far...


I haven't decided what to do about eyes yet - whether to use buttons, or machine embroidery or a mixture of the two. I think I'm swaying slightly towards the buttons, but we'll see.


It's also obviously a great way to use scraps, even tiny ones. These oblongs range from 12 to 15 cm by 8 cm.


So, do you have any kind of daily, creative practice? Whether it's drawing or sewing or something completely different? Or would you think about starting one maybe?

Sally.

Friday, 6 March 2015

This Moment

Here's a link to Soulemama's moment, and here's mine...

{this moment} ~ A Friday ritual. A single photo - no words - capturing a moment from the week. A simple, special, extraordinary moment. A moment I want to pause, savor and remember. If you're inspired to do the same, leave a link to your 'moment' in the comments for all to find and see.
. . . . . . . . . . 


Thursday, 5 March 2015

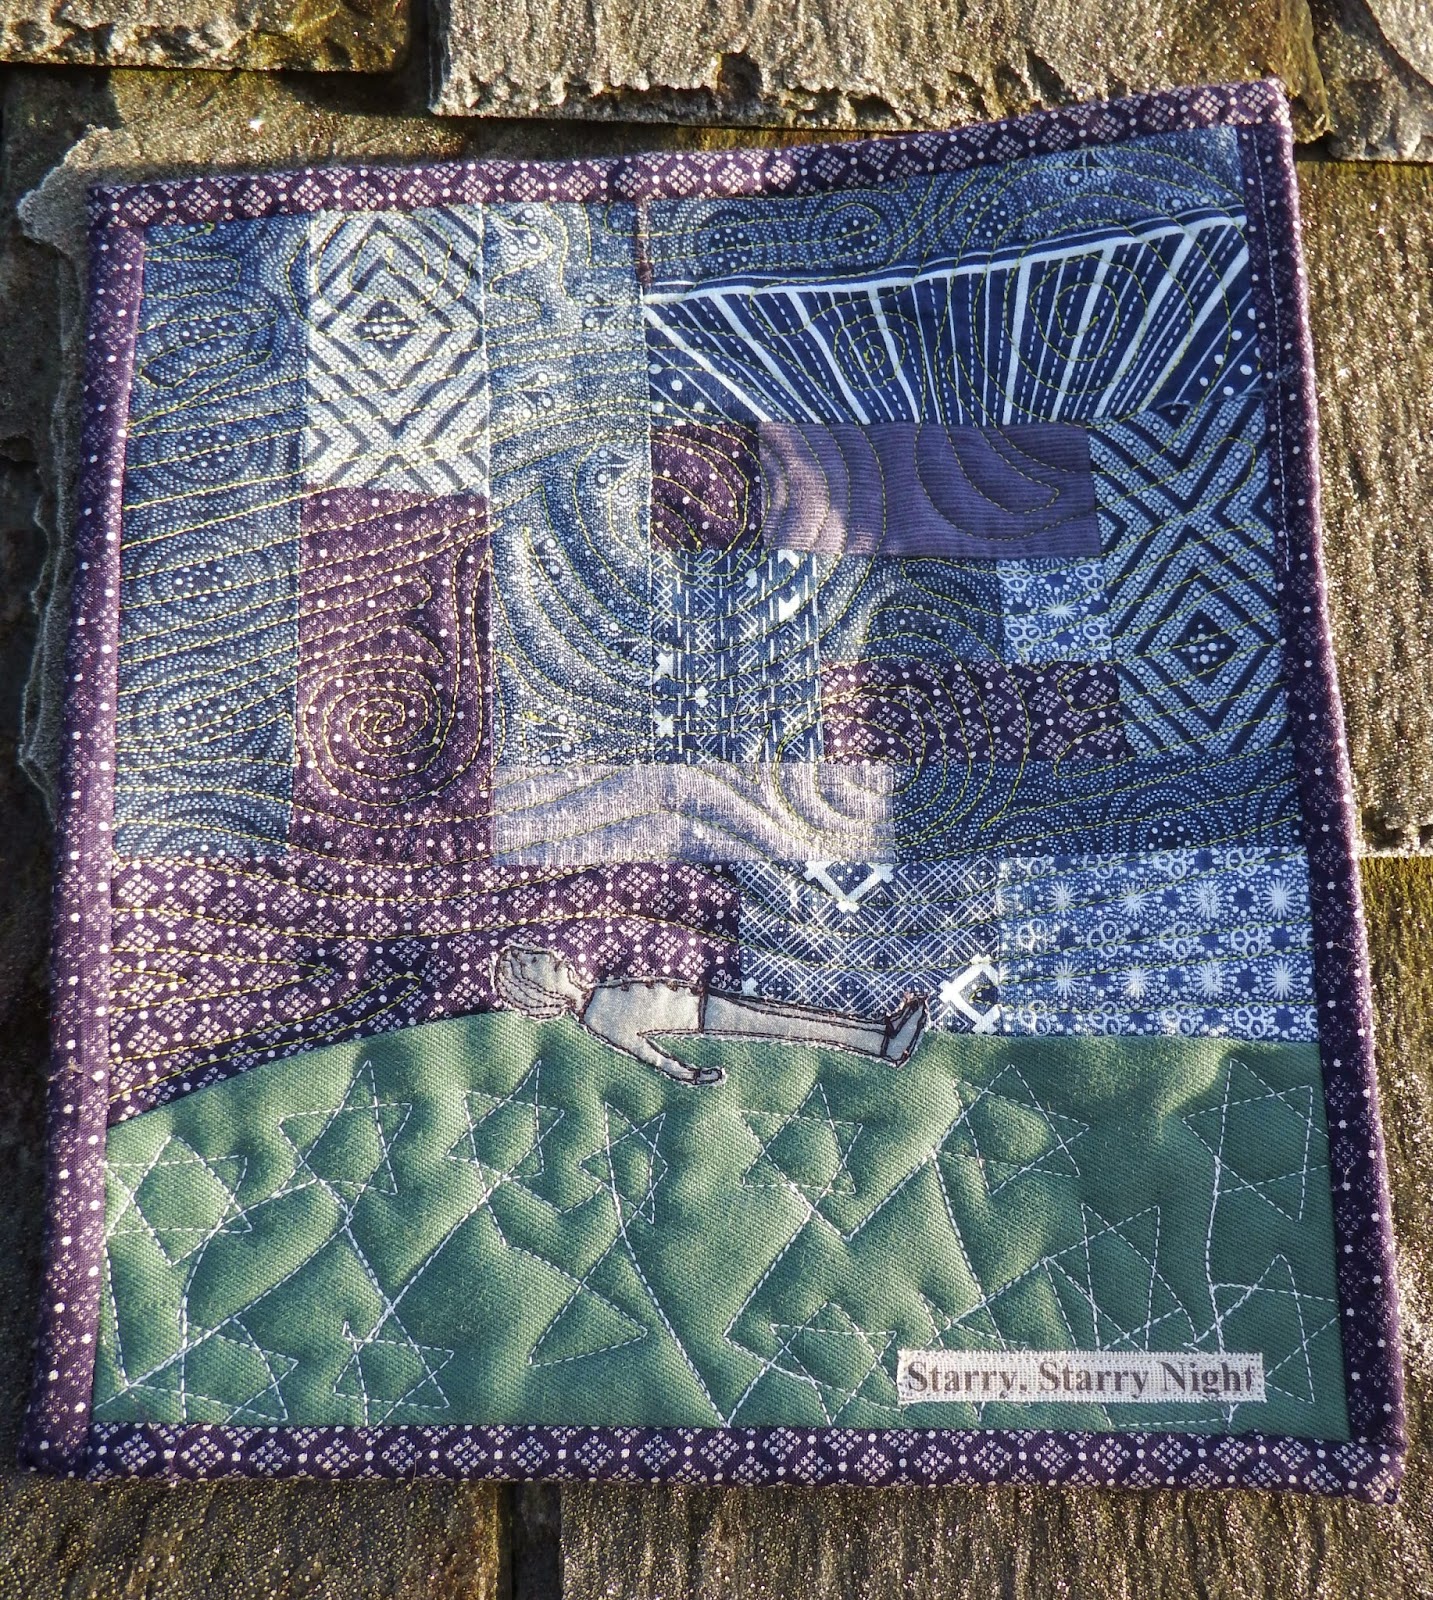
'Starry Starry Night' Mini Quilt


We've had quite a few cold, but incredibly clear nights over the last few weeks. There was one night in particular that made a big impact on me. We'd come home late and the sky was just spectacular, so many stars. I discovered, only very recently, that Exmoor was designated the first International Dark Sky Reserve in Europe a few years ago; although we're not on Exmoor itself, we're quite close and we're very lucky that we have virtually no light pollution in the night sky either. We're also fortunate to have an amazing, panoramic view of the sky here. I couldn't catch it in a photo, unfortunately, so I can't share it with you, but after standing outside gazing upwards until I was far too cold, I came in singing Don McLean's 'Starry, Starry Night', a song I love anyway, and wanting to turn it into a mini quilt.

As well as loving the song, I also love the painting Starry, Starry Night.


Van Gogh is a character who's always fascinated me and I've had a love of so many of his paintings for a long, long time. After thinking about his Starry Night painting, I decided that I really didn't want to try and base my mini quilt around that, apart from it seeming ridiculously presumptuous and over ambitious, it just isn't how I perceive the night sky. (I think one of the things that fascinates me about Van Gogh is how he does see the world in a completely different way.)

I decided to make a very simple quilt using some fabric scraps that I bought at a quilt show a year or so ago - from The African Fabric Shop. The scraps were from this range of Shwe Shwe fabric.


They've been sitting, admired but untouched, in a pile of fabric for too long, this was the perfect opportunity to use them, with a few other blue scraps I unearthed.

When I was trying to decide how to quilt my pieced front, I started reading a bit more about Van Gogh's Starry, Starry Night painting, wondering about maybe using his swirls as inspiration for the quilting. And I came across this clip on turbulence, and how Van Gogh managed to depict turbulence in his work artistically, but also very accurately from a scientific perspective, something that was way ahead of his time. Personally, I found it really interesting, it just added to my fascination with how he saw the world around him, so I'd definitely recommend a quick watch (it's only about 4 minutes long I think), but if Van Gogh does not interest you in the slightest then sorry for going on about him here!

Anyway, after finding out more about the swirls, I definitely wanted to try and use the idea in my quilting. As you know, my quilting is not great even on small pieces so don't look too closely, but it maybe gives a little bit of the effect I wanted.

I made this corner reach up higher to try and get a bit of a feel for the vastness of the sky above, but I don't think it worked!
I found a colouring page of the painting too (here), which was quite helpful visualising quilting lines.
As well as my special fabric, one thing I do really like about this Mini Quilt is the fact that I printed my words for it on to fabric, which I then just machine sewed on to the quilt...


I like this from a 'how it looks' perspective and also from a 'didn't have to sew the actual letters for a change' perspective! I've been wanting to do it this way for a while, but waiting for the right project. I'm sure I'll be doing it again soon (I experimented with printing on fabric, just in a normal pc printer, back in the Summer, this time I used a piece of bondaweb ironed on to my fabric and cut to A4 size, it worked really well).

I do also like my star gazing person, lying down, looking up at the sky...


This was exactly what I wanted to do to gaze up at the stars, but the ground was way too frosty and cold - I'll wait till the Summer for that!

So I have another mini quilt done, ready for my wall, that will remind me of a particular moment in my life, and that will make me sing a particular song whenever I look at it. It feels vaguely reminiscent of my 'Morning has broken' Mini Quilt in many ways, perhaps I'll hang them next to each other.

This one is a little smaller than 'Morning has broken', it's just 31cm by 28cm -ish!
And for anyone who is interested in Van Gogh, and in particular his Starry, Starry Night picture, here's a bit of a summary of some of the information I came across...

After mutilating his ear in 1889 (he didn't chop it all off, just a piece of the lobe), Van Gogh checked himself into an asylum at Saint-Rémy-de-Provence and during the year he stayed there, the heavy output of paintings he had begun in Arles continued, he produced some of the best-known works of his career. He painted Starry, Starry Night, in June 1889, from there, it depicts the view from the east-facing window of his asylum room, just before sunrise, with the addition of an idealized village.

In early June Vincent wrote to his brother, Theo, "This morning I saw the countryside from my window a long time before sunrise with nothing but the morning star, which looked very big." Two scholars, working independently of each other, have determined that Venus was visible in Provence in the spring of 1889. So the brightest "star" in the painting, just to the viewer's right of the cypress tree, is actually Venus.

Van Gogh had also written in another letter, "A starry sky is something I should like to try to do, just as in the daytime I am going to try to paint a green meadow spangled with dandelions." He compared the stars to dots on a map and mused that, as one takes a train to travel on earth, "we take death to reach a star." Although at this point in his life Van Gogh was disillusioned by religion, he appears not to have lost all hope for an afterlife. He voiced this ambivalence in a letter to his brother after having painted Starry Night Over the Rhone, confessing to a "tremendous need for, shall I say the word—for religion—so I go outside at night to paint the stars."

In a relatively short period of ten years, Van Gogh made approximately 900 paintings. He only sold one during his lifetime. Vincent’s brother’s wife collected Vincent’s paintings and letters after his death and dedicated herself to getting his work the recognition it deserved.


That's it for the Van Gogh tribute! Have you got any favourite artists whose work you love?

Sally.


Wednesday, 4 March 2015

Pocket in a Log Cabin Block


I started Maria's quilt back in January with a 'Lift the Flap' Log Cabin block. For the next block I've made a 'pocket' within my log cabin rather than a flap. I started out with 3 pieces of fabric, 2 the same size, for the front of the pocket, and one a little longer but slightly slimmer for the back of the pocket.


I'm going with a quilt as you go method, so I already have a square of backing fabric here too. I sewed my larger piece down on to the backing fabric in the position I wanted the pocket.


Then you sew the 2 identical pieces together along 3 sides, right sides together, leaving whichever will be the bottom side unsewn and open.


Turn this 'bag' the right way round, gently poking out the corners and iron flat.


Now, you can just create an empty pocket, and use it to hold something 'loose', but I know what my children are like for losing small, loose items! This pocket is for 2 cats, so rather than just popping them in 'loose', I'm sewing them in on long tabs so they can't be completely detached from the quilt, and therefore can't be lost.

Here are my basic cats, with a long tab of fabric inserted up their bottoms!

The cats are very much taken from our 'Ten in the Bed' make before Christmas, I loved them so much then that I couldn't resist using them again. And if you wanted you could use a ribbon instead of creating a tab, but I do sometimes find ribbons don't stand up to repeated use and washes very well.

So before doing any more pocket assembling, I sewed my tabs down onto the back of my pocket.

I used a zigzag stitch and sewed them on very securely to allow for plenty of tugging by small hands. I've left the front of the pocket in this picture too, but folded up.
And then sew the front of your pocket on, along 3 sides, leaving the top open obviously. And make sure your raw edge of the front pocket is at the bottom. I just had to be careful not to catch the tabs or my cats in the sewing here.


Then I just built a log cabin up around it as normal, again taking care not to sew over cats or tabs. So this now conceals all my pocket raw edges.


I've made another 'Flap' block, which will probably go just above this cat pocket block in the finished quilt.

They both need a good trim and some quilting still.

Underneath the purple 'flap' is a little mouse...

Still in need of eyes!
Whom the cats will be sneaking out of the pocket to try and catch!

The baby cat is still missing his eyes and face, I need to find some tiny green buttons for him.
I'm sure they won't eat him though!

Sally.


Friday, 27 February 2015

This Moment

Here's a link to Soulemama's moment, and here's mine...

{this moment} ~ A Friday ritual. A single photo - no words - capturing a moment from the week. A simple, special, extraordinary moment. A moment I want to pause, savor and remember. If you're inspired to do the same, leave a link to your 'moment' in the comments for all to find and see.
. . . . . . . . . . 
I know it's supposed to be no words, and I was so nearly not going to cheat, but not sure whether you'll realise there's a cat snuggled up there with her unless I do!