Tuesday, 19 November 2013

Robin Cushion

I've spent today painting kitchen cupboards, they're coming on very nicely, the builder is feeling much happier about them going into his beautiful kitchen, but they're not quite ready to photograph and show you on here yet. So I'm just going to show you a cushion I made as a present for someone a week or so ago instead.
 
I've got some Christmassy robins I made that I might show you a bit nearer to Christmas, when I dig out all the decorations, they're very similar to this design.

The Robin is made from scraps of wool and other fabric, with a button eye. It's machine sewn on to the background, and the legs are machine sewn.


The background is made from a lovely, thick wool blanket. It's a simple 'envelope' type cushion, and the blanket stitch edging of the blanket was perfect to use for the exposed edge of the back of the cushion.


I added an extra layer of wool behind the front of the cushion and machine stitched some simple, swirly quilting lines to add a bit more to the design (I think this was partly because I was getting a bit bored with all the straight lines in Sam's quilt - progress still quite slow there, maybe he'll get it for Christmas!).


I do like bird appliques which are quite realistic - for instance in my Bird Quilt - but a fun, quirky bird is always great too.

That's it for today, Sally.

Monday, 18 November 2013

Plundering attics and cellars

For those of you who are regular readers, you might remember that I've mentioned in the past that we have building work going on at the moment, and that this is being done for my parents to come down and live in an annexe to our home. This plan has been in place for probably about two years now, and the building work itself has been going on for over 8 months. So we've all had plenty of time to prepare - both practicallly and emotionally. But now the seemingly endless building work is coming to an end, a moving date has been set, a lorry has been hired - and it's happening two weeks today. All of a sudden the situation has become more than a little scary all round. As much as we've had time to become accustomed to the idea and organise ourselves, it still feels like we're all hurtling headlong into completely unknown territory.

My parents have lived in their current home, a large, four storey Victorian house, for well over 40 years. They're moving 275 miles down country to a one bedroom annexe, and they're both in their very late 70's. So to say it's quite an upheaval for them is possibly a slight understatement! As for us, before I start worrying about geting used to the adjustment in our lives when they arrive, we've first got to get through the next two weeks so that we're ready for them. There are so many small details left to sort out - curtain rails, curtains, lighting, telephone lines, carers, stair lifts... - as well as the slightly more major issue of their 'kitchen' area currently being completely bare!

So, basically, what I'm trying to say is I might be slightly more erratic in my posting around here - both over the next couple of weeks with final preparations and then in the following week, at least while the dust settles a bit. It may very well be that there are quite a few things to share with you for these next 2 weeks from the final preparations - I'm all excited about some of the lighting that will be going in, I have kitchen cupboards to revamp and lampshades to make, so I'll try and snap away at all this kind of thing with my camera. But I'll just have to see how it all goes really.

For today, I've got a few photos of my starting point for some of these projects. Since my parents are both supreme collectors and hoarders (I really didn't stand a chance with this gene pool!), and since they obviously have over 4o years of hoarding and collecting stashed away in their present house, it has been a treasure trove of goodies over the last few months as we've tried to sort through everything. I was up there this weekend, for quite possibly the last time, and had a final plunder, particularly of their attic and cellar!

I found these old jars in the cellar a couple of visits back. These are the basis for all the upstairs lighting (there's a bedroom and a conservatory upstairs). I'm hoping this is all going to be in place over the next couple of days and I'm really looking forward to seeing it, so definitely watch this space to see how these are upcycled. (I should say I have a very good and quite adventurous electrician, who's prepared to try and put my ideas into practice here - I'm not tackling any of the electrical side of it myself.)


This ancient, kitchen wall cupboard I found in the attic...


And along with a couple of ancient, freestanding floor cupboards I've found locally...

Here's one of them, along with another smaller wall cupboard, slight repairs needed to one side of it!
...this is going to become the 'kitchen'. There's a secondhand sink lurking somewhere too. And this scruffy lot is my main job for the next couple of days. I've got to get them painted and beautiful for, ideally, Thursday, so that the builder can fit some worktop above them. Unfortunately I couldn't find secondhand worktop in time, so that's going to be new. I'm really hoping that I manage to pull off a respectable, bright, cheerful kitchen - I have a vision of it in my head but so far everyone else looks at these cupboards and thinks I'm bonkers! They could all be right, the builder in particular is extremely sceptical and not overly impressed at the junk I'm bringing into his beautiful, top quality build! But even if my tastes didn't lean heavily to this kind of look and even if I didn't always favour secondhand over new, unfortunately there just ain't any money left in the pot for a swish, new kitchen!

And the last thing I've photographed for today isn't for the annexe. My 'Granny' used to be a piano teacher and I found lots of her old sheet music up in the attic (she had a Granny flat up there when I was little). I brought a handful of it back with me. The carols I have plans to use in some Christmas making (involving decoupage), whether it gets done for this Christmas I'm not sure yet! And there are lots of other song titles that are crying out for unknown, future sentimental projects - for instance, 'It had to be you', one of the main songs from the film 'When Harry met Sally', surely I could think of something soppy to do with that before Valentine's Day?!


And another sentimental find was the music for the Gracie Fields' song 'Sally'. This song was one of my Mum and Dad's favourites when they were young and was the main reason that I was called 'Sally'. I feel that really Harry should have discovered this and made me something for Valentine's Day with it...


...but, realistically, to coin a phrase from the era, I had 2 hopes there - no hope and Bob Hope! So I guess I'll just have to think of something to make for myself from this (I'm sure there are some Bob Hope songs in my pile too!).

That's it for today and I'm hoping you'll bear with me over the next few weeks if need be, Sally.

Friday, 15 November 2013

This Moment

Here's the link to Soulemama's moment and here's mine...

{this moment}
A Friday ritual. A single photo - no words - capturing a moment from the week. A simple, special, extraordinary moment. A moment I want to pause, savor and remember. If you're inspired to do the same, leave a link to your 'moment' in the comments for all to find and see.
. . . . . . . . . .


I think I'm most likely going to be away this weekend, so I'm skipping the blog tomorrow and will be back again Monday. Happy Weekend to everyone, Sally.

Thursday, 14 November 2013

Plastic Canvas Bunting and a Penny Rug


So we started our plastic canvas circles here, with a plan to turn them into some bunting for our living room. It has taken quite a while but they are finally finished and in place.


Venetia and I both made four each, and Theo made one. Maria is still making hers!


Now I've managed to get photos uploading again I've gone for overkill on them!


I added pompoms between each circle. My pompom making skills are very poor, so I used a pompom maker (here), even with this, my early attempts were completely pathetic. With a bit of practice and some help from Theo, this was the evolution of my pompoms!


They got to a point where they were just about good enough to be used and I simply threaded a long, double length of wool through the pompoms and through the backs of the circles, alternating between the two.

It turned out just as I imagined right at the start of our making and I really like how well it goes with my rug. Did you spot it on the floor in the photo above?

Photo: Hi Michele, since you now have your very own page, here's a photo for you, not a very good one, you'll have to come round and see it in the flesh. And have a look at this blog - filminthefridge.com, go to the "quilts" bit along the top, lots of beautiful pictures of quilts to look at XXX

I made this quite a while ago, before I started blogging. It was all hand stitched, which is unusual for me. I started it one Christmas and finished it soon after the following Christmas, it was something that was done very gradually, as and when I was in the mood for some hand sewing. It's made entirely of recycled wools which I found in Charity Shops. Lots of jumpers, jackets and skirts all chopped up. (I could really do with taking a photo of it outside in daylight so you might get a better picture of some of the lovely fabrics, but, with our short daylight hours now, I'm afraid I don't have any big enough helpers around while it is light, maybe at the weekend.)

The background and the base of the rug are from a wool blanket, which I dyed, and it has another layer of blanket in the middle to give it a good weight. I 'quilted' it by hand, in a thick wool, with crosses between the 'pennies'.

And after finishing the rug, I made a few cushions from the same fabrics.


The bunting is just what I needed to add an extra wool dimension to the room, and although it's only just gone up, it feels like it's always been there. I think that's an indication of how well it fits in.


I'll be back tomorrow with a photo, Sally.


Wednesday, 13 November 2013

Blogger's Quilt Festival Link

I'm having big technical problems today, I can't seem to upload any of my photos to the blog. I have been trying off and on for quite a number of hours and nothing is working, so I am finally admitting defeat for the day and giving up. And since a post without any photos doesn't bear thinking about, you'd better all go and read someone else's blog for today! You could do a lot worse than try this post -Bloggers Quilt Festival Winners at Amy's Creative Side. Click on the winners listed and you will find some amazing quilting eye candy. Or you could just have a browse through Amy's quilts, like this one:

In some ways it's even more frustrating that I can upload someone else's photos, but at least it gets a bit of colour on the page after all. Find this quilt on her blog here.
I'm really hoping normal photo uploading service will be resumed tomorrow because I was going to show you our completed plastic canvas bunting, fingers crossed I'll be back with that tomorrow, Sally.

Tuesday, 12 November 2013

Winter Trees

As well as plodding on with Sam's Quilt, I've been trying to get a little more of my Tree Quilt finished. My plan with this one is that, among other things, there'll be a tree block for all seasons in there. And for the last few days I've been playing around with 'Winter'. This was my initial sketch that I've been sort of working to:


I chose some thrifted, dusky blue fabric for the background, and had my silver birches all ready to go from an ancient jacket I cut up. I've been using bondaweb for the tree appliques with this quilt. I do usually try not to use the stuff for applique too often, purely from a cost perspective. I usually manage with just pins, but I decided all my fiddly branches warranted spashing out on some bondaweb. It does make life much easier (you can find it here). So I was all set to iron on my birches when I had an idea to try and bleach some snowflakes on to my background first.

After lots of experimenting (much more fun than bleaching the toilets, which is what I really should have been doing!), I finally decided that my preferred method was:
  1. Use the girls' snowflake hole punch to punch out snowflakes in some tacky back paper I found hiding in the back of the craft cupboard.
  2. Stick this down on the fabric and very delicately dab a cotton bud dipped in bleach into the centre of the snowflake - I removed any excess bleach from the cotton bud beforehand each time.
  3. Then, again very delicately, dab the cotton bud around the very edge of each of the snowflake points and remove my tackyback stencil. It would have been great to just dab the bleach on the whole snowflake stencil, but unfortunately I found it bled through around the edges far too much and left me with a big blob.
  4. After removing the tacky back, I dipped a needle in bleach and carefully traced a small line from the centre to each of the bleached points. Some of these snowflakes worked better than others, and it was extremely easy to dab on too much bleach, but I wasn't expecting a perfect, uniform snowflake pattern.

Before I got going on my actual square of fabric I roughly drew in where my trees were going to go, so I could concentrate the snowflakes in between them.
 Once I'd finished I left the fabric to dry and then washed it. Here it is drying again:


I liked it, so I went ahead and ironed on the silver birches. After sewing around them, I drew on some bark detail and began machine sewing it on to the trees.


It took a lot longer than I expected, still more fun than bleaching toilets but I was very glad to finish!


I think it looks quite simple and it's not a particularly large square, but I think it could be the longest I've taken on a quilt patch this size. I'm not really sure how that happened! I do quite like it (though I sort of wish I'd bleached more snowflakes on there now) but I have got far too many other things to do (including toilet cleaning!) to repeat the process too often!

Quick wins are always great, unfortunately they don't often go hand in hand with quilt making, but then I suppose the time and effort that goes into making a quilt is what makes it so special.

Back again tomorrow, Sally.
PS I did eventually get the toilets cleaned too!

Monday, 11 November 2013

Alphabet stamps and clay

We had a bit of a play around with some air drying clay at the weekend. Venetia wanted to make a name sign for her door, and I ended up making a little 'thank you' heart to send to my Mother-in-law for my new sewing machine.

In keeping with the rest of her room, Venetia, of course, went for a butterfly shaped sign.


I almost forgot to photograph it along the way, so this photo had, as you can see, already got a bit of paint on when I suddenly remembered to get out the camera.
 The antennae for the butterfly are made from a cotton bud, broken in half and then poked firmly into the clay. We used alphabet stamps to make indentations into the clay for the words, and Venetia added some little butterflies too.

Here's the heart:


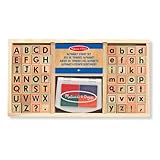
The stamp set we have is this one:
Product Details
You can find it here on Amazon.

It was a Christmas present last year and has been great, fun for the children and useful too.

Once it was dry we began the painting, including a layer of glitter glue to add a little sparkle, and then gave everything a coat of mod podge to seal it.


Here's our finished work:


Venetia is very happy with her new door sign, and I feel like the heart is a nice, slightly different way, to say a thank you.


Alphabet stamps open up lots of possibilities with clay - how about some posh gift tags or place setting names, as well as a whole host of different signs you could make?

Back again tomorrow, Sally.