Next birthday present, continuing the rainbow theme, and loosely based on a ballet costume back here.
Apologies in advance, this post is going to be top heavy with photos - but I defy anyone to make a Patchwork Rainbow Mermaid Tail and then not take lots of photos!
I really wasn't sure how I was going to make this initially, so my method was the usual, trial and error, haphazard kind. I started out with a thin piece of fabric in this kind of shape...

I made sure the top width was approximately the size of Maria's waist. Then I cut out lots of pieces of fabric, in all the colours of the rainbow, and started playing around with them. I began by working the rainbow across the top, and then shifting along one to the right on subsequent rows....

But I got to this point and decided I didn't like it, and it wasn't looking rainbowish enough.
Then I decided to do a whole row of each colour instead, and I started at the bottom (much easier!) with the purples.


I liked this arrangement much better, so I stuck the pieces down with a quick spray of 505 basting glue. And then started puzzling over how I would manage the bottom of my tail which I wanted to 'fan' out. I had thought I'd do this 'fan' part in a single piece of fabric, but once I was at this point that didn't seem quite right anymore. So I sprayed another piece of my foundation fabric roughly in place...

And then cut out some longer 'scales' in all the colours to slip underneath for the 'fan' part. I had to add another couple of purples in the main body to get it to layer up nicely so the tops of the 'scales' weren't showing, it was very much trial and error.

 |
| If I make another, then obviously next time I'll start with my foundation fabric this kind of shape right from the start. |
 |
| If you're very eagle eyed you might notice I subbed in a few brighter greens before sewing them down, I felt like it needed them. |
So all the scales have their raw edges showing - if you wanted to there are several more precise ways to do 'Clamshell' patchwork, but this way was fine for me!

Then I sewed around my 'scales' again several times to secure the layers and to give it a bit of structure. It also helped the white 'scale' sewing lines to show up nicely on the plain inside.
After lots of thought (mainly about how fiddly it would be to try and 'hem' all the curved edges!), I decided to just trim the plain fabric up to slightly larger than the rainbow side, to create a small border almost, and I stitched all around it but left the edges raw - any fraying is just going to add to the effect! So here it is now, with a top piece left on for a waist band.


I did turn over a small hem at the side of the waist, and then cut out another strip of fabric, also hemmed at the sides.

Then, right sides facing, I sewed these together...

And then pressed it down towards the top of the rainbow, ironed a narrow hem and sewed it down just covering the top of the rainbow row. Sorry, I seem to have forgotten photos here. I left the sides of the waistband open and inserted elastic into it to fit Maria's waist and hips.
And that was it finished.


And it is reversible, but very much a rainbow tail whichever way it's worn.


On the plain side the 'scales' show up nicely - better in real life than in a photo.

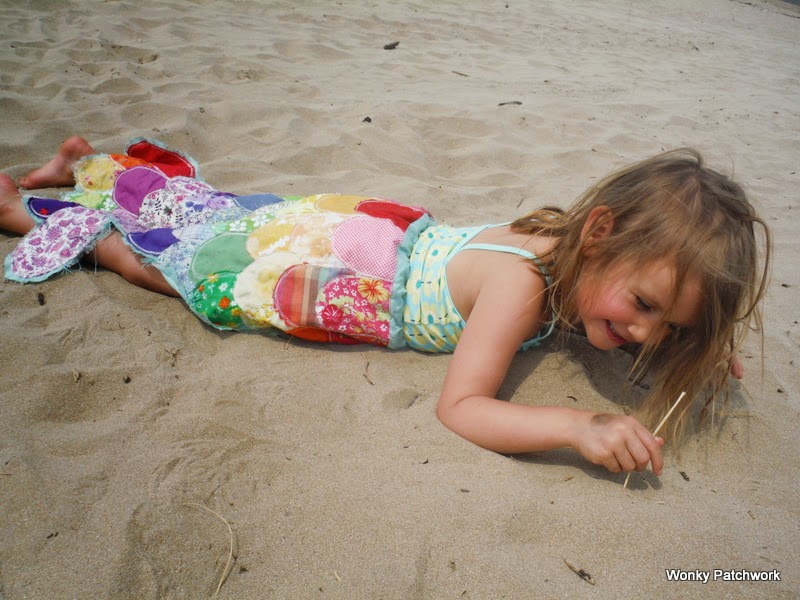


There was just enough breeze to let the tail float up beautifully behind, especially when running.


Maria had to keep checking on it though...


And as we got closer to the water's edge...


She got a little too worried about the tail getting wet and decided it had to come off. I would probably have been all for a full on photo in a pool, but she was more protective of her tail!


Sally.
Okay, you are totally amazing!!! That is awesome, and your little mermaid is adorable.
ReplyDeleteHow fun!!!
ReplyDeleteIt absolutely gorgeous!!!! I am so very impressed! Your little Mermaid is darling, and I dare say she looks quite thrilled with her love l mermaid tail.
ReplyDeleteIts awesome, completely wonderful! She looks so delighted with it. I love that she didnt wan to get it wet. You could make a lovely adult skirt with the 'scales' as a back panel and a flowy front?
ReplyDeleteNim saw the pics and exclaimed that she 'needed' a tail too!
That is ingenious - I'm thinking I might have to squirrel it away as an idea for someone's rapidly approaching birthday!
ReplyDeleteI always knew she was a mermaid and I'm happy she's found her tale. It's a beautiful, elegant and majestic tale, at that.
ReplyDeleteAdorable! I love those patchwork scales! Oh darn- another handmade present I *have* to make;)
ReplyDeleteWhat a fabulous idea, Sally and SO much fun for your daughter!!! No wonder she didn't want to get it wet. I wouldn't either.
ReplyDeleteFeatured today, Sally...
Deletehttp://www.threadingmyway.com/2014/07/threading-your-way-features_12.html
This is fabulous! Thanks for sharing the how to also. :) Saw your feature at Threading My Way.
ReplyDelete