Thursday 31 October 2013

Fairy Doll

For a different birthday present I decided I'd adapt my Russian Dolls and make a fairy doll instead. I seem to have taken loads of photos on this one so here's the making of it in pictures:


I used the sleeve of an old wool jacket.

Sewed on a face and a few flowers to pretty her up a bit.


Wings fron an old wool scarf, with machine sewn 'veins' - helped to stiffen them up as well as add visual detail.

Folded over and sewn down the middle too, so they stick out a little.
  
Now sewn onto the back piece of the doll.


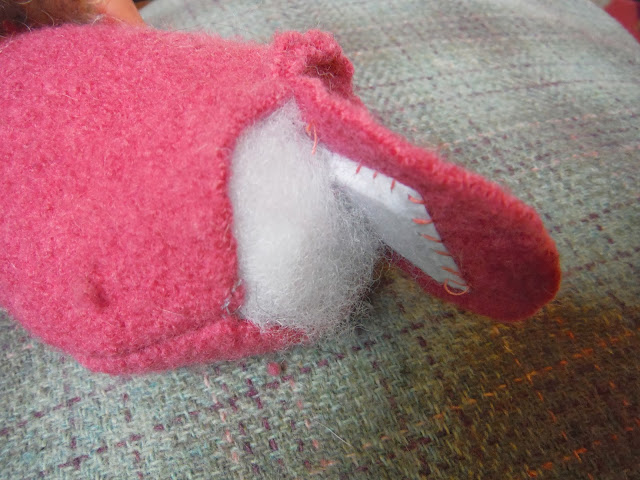
Right sides together, sewn together - making sure the wings are well folded up inside so they don't get caught in the stitching.

Sew a weight on the inside of the base to help her stand up.

Stuff and hand stitch on the base.

Hand stitch on some 'leaves' for a little cap. The 'blue' marks you can see are from a water soluble fabric pen, it just wipes away with a damp cloth,  great for embroidery and loads of other things too. I use mine a lot. Find them here.

Stitching on more leaves...

Here she is finished.

Her bottom!

Her back! Told you I took lots of photos!

Hurray, she does stand up!

A leaf with some machine sewn veins - this is actually the back ...

Here's the front - a leaf sleeping bag today.


She just about fits...

In she goes! All done.

See you again tomorrow, with a photo, Sally.

Wednesday 30 October 2013

Little Russian Dolls

I've had a couple of birthday presents to find for little girls recently, October seems to be a very popular birthday month. These Russian Dolls are one of my favourite girl presents to make, I've made them a few times now.


I got the original idea from this book

Here on Amazon.

Can you see the little Russian dolls at the bottom? They're very cute.

In the book the front and back are just sewn directly together, but I prefer to hand sew a circle of wool (or felt) at the bottom, so that they stand up - although to help with that I also hand sew a weight on the inside of the wool circle first (I use the kind of weight you can get to put in the bottom of curtains to make them hang beautifully). 


These are the dolls at various stages of the making. The purple one is ready for its ric rac before sewing the front and back together and stuffing. You can see one completed (one of Maria's) with the circle of wool as a base.


In the book the dolls are given little blankets and there are instructions for making a fabric basket. I decided mini sleeping bags would be much more fun for little hands than the blankets. And the first time I made them I really didn't get on very well with the fabric basket idea (mine was rubbish!), so I decided to put them in a real basket. And I actually much preferred them that way so I've stuck with it ever since (charity shops are always a very good source of baskets). I did mention yesterday that I like to tinker a little with instructions, didn't I?!

The sleeping bags are very easy. I make my 'front' and then get a plain piece of fabric and sew them together just along the top, right sides together.


I often add a bit of applique now and then sew some quilting lines. Here's another one at this stage, with its oblong of wool ready for the back of the sleeping bag.


And then, again with right sides together, I sew the 'front' and the wool back together.


If you wanted to be neater I'm sure you could add extra stages to avoid any raw edges on the inside of the sleeping bag. Or you could make it in an entirely different way - the sleeve of a wool jumper or a sock perhaps?

Here are the dolls with their sleeping bags:


Each doll has a pretty button sewn on next to her face.
  

I always make a quick, thin 'mattress' for the basket too.


And here they are all tucked up together.


Hopefully just right for a little girl's present.

Back again tomorrow, Sally.


Tuesday 29 October 2013

Quilting Happiness

Do you remember I was hoping to receive a copy of Quilting Happiness for my birthday from my lovely Mother-in-law? Well, it arrived!


So, I thought I'd tell you a bit about it...

It has twenty different quilting projects for you to try. These are all lovely, as you'd expect, but not the most interesting or useful part of the book for me. Especially as quite a lot of the quilts (not all, notice!) do benefit from careful measuring, cutting and piecing. There are very detailed, useful instructions on how to make these quilts, so, for quilters out there who will take the time to work carefully through these, I'm sure the book will open up different designs to try that otherwise might seem a bit daunting. For quilters, like me, who really don't like working through instructions ever (I can't even follow a simple recipe without trying to tinker with it in some way!) then there's still some scope to recreate the quilts in our own way - although probably with far less precise results!

You probably won't be surprised to hear that the quilting project that I most want to try out from the book is titled 'The Haphazard Chevron Pillow'! Here it is:


I've got someone I'd like to make a quilt for in just 2 colours. I had already been thinking a chevron quilt might be a possibility, but I haven't been too enthusiastic about sticking to a very rigid (and possibly slightly boring) chevron pattern, so when I saw this page it seemed like the perfect solution.

But, getting away from the quilting projects themselves, the parts of the book which were more interesting to me were those that encouraged you to explore your own creative style, recognise what quilts you most liked to make, perhaps push yourself out of these comfort zones occasionally, just make you think about why you like to make quilts even. And also the parts of the book which looked at the stories behind other quilters - who maybe made quilts for charity or within quilting groups or who made very personal quilts. Lots of snippets jumped out at me from these areas of the book, for instance:
  • ideas for group projects - eg, within a group each person chooses a piece of fabric that is particularly special to them and cuts it up, so there's an equal piece for everyone. Each person will then have an 'interesting collection of fabrics that represent the whole group' and then everyone can use these in a small quilting project.
  • when making a quilt as a gift for someone - 'Ask yourself what words best represent your recipient. Look at the quilt you're planning and find a space where you can tuck these words into the design'
  • creating an online group charity quilt - choose a colour scheme and get members of the 'group' to make a quilt block each and then send them in to a central person to assemble, quilt and bind. I'd love to do a quilt for Hope Sews like this. I'd be happy to assemble, quilt and bind so if anyone out there would be interested in making a block please leave a comment to that effect and we could see if there's enough interest to get one done.
  • making a collage of colours/patterns/designs/pictures/words etc that jump out at you from magazines - to help identify your own personal style.
That's just a sample of some of the ideas that stuck with me. The last one - making a collage - was something that several amazing, quilting bloggers did in a 'blog hop' to help 'launch' the book in the Summer - have a look here to see one of these posts and find links to the others.

As far as my personal style is concerned, I think I have a fairly strong idea of what I like to create. I love to make 'pictures', either one whole picture or individual pictures within a quilt. Often this involves applique (eg bird quiltwool flower quilt), but not always (eg Sunshine Quilt). Obviously I love working with recycled fabrics, particularly wool. I generally love bright, bold colours and patterns, especially if there's a hint (or more!) of 'retro' about them. Paler, more intricate and subtle designs and patterns aren't so much my kind of thing. I also love lots of contrast with my colours. (I've just flicked through 'My Quilts' on here to see how they measure up against those statements - and yes, that all seems to fit!)

With all that in mind, it's no wonder I've been very 'happy' to start doing a little on a new quilt this week. I've started the 'tree' themed quilt that's been in my 'queue' to make for a while. And that's meant lots of sketching trees and appliquing them on to blocks for the finished quilt - perfect quilting happiness! None of these are finished yet, quite a few leaves missing for a start, but here's a sneak peek so far.


That's it so far. And I've also been doing little bits of sewing here and there on two smaller, non quilting projects over the last few weeks, so I'll be back with one of those tomorrow, Sally.

PS Don't forget - if you're interested in making a block for a Hope Sews quilt and sending it to me, then please leave me a comment and we'll see if we could get one done. They're not big quilts so it really wouldn't take many kind volunteers to do one.

Monday 28 October 2013

Making Pumpkins

We've never been huge on Halloween here but I've been trying to get in the mood today by making pumpkins with the girls. They were loosely inspired by this pin,

My DIY Projects: Present your cookies in a different way!

I know, it doesn't look much like a pumpkin. But if you substitute orange paint chips then it does start to look slightly more seasonal...


Please ignore all the far too visible mess in the background!


(Apologies for the terrible photos, I had to take them on Harry's phone, my camera is dead and refusing to charge up at the moment. I have such a terrible track record with cameras, but I'm hoping it's going to have a miraculous overnight recovery.)

We're planning on carving the real pumpkins tomorrow but these paper versions were the warm up act today. If you're looking for other child friendly Halloween crafts there are quite a few more paint chip ideas on Pinterest, how about a garland like this:

Halloween Garland I made after seeing something on Pinterest made by raiding the paint chips at Home Depot.
http://www.pinterest.com/pin/139330182191314255/

Pinterest is full of paint chip ideas generally in fact, this board - http://www.pinterest.com/sherron/paint-chip-crafts/- has lots that are quite grown up too.

Hope your Halloween preparations are going well and I'll be back tomorrow, Sally.

Friday 25 October 2013

This Moment

Here's a link to Soulemama's moment, and here's mine...

{this moment}
A Friday ritual. A single photo - no words - capturing a moment from the week. A simple, special, extraordinary moment. A moment I want to pause, savor and remember. If you're inspired to do the same, leave a link to your 'moment' in the comments for all to find and see.
. . . . . . . . . .


Thursday 24 October 2013

Homemade Chicken Nuggets

This is going to be a very quick post today, all I'm going to share with you is the recipe for last night's tea. A really easy recipe for homemade chicken nuggets - follow the link to see it! I didn't take any photos I'm afraid, it was an extremely chaotic meal in a very messy kitchen, and as well as that they all got eaten super duper quick, but here's the 'official' photo.

RITZY CHICKEN NUGGETS

I think mine did in fact look better though! And I made mine from chicken thigh fillets, didn't bother with the tenderizing bit, oven baked them rather than frying them and made them with breadcrumbs (with some salt and pepper) instead of the ritzy crumb. So, in fact they were almost completely different! But the clever, key part of the recipe is the buttermilk, and that I did use. It works brilliantly and is very easy. Try it!

Another recipe I use from the same site is for squid - this one has a really easy and effective 'batter' for frying the squid, if that's your kind of food then it's worth a try too.

That's it for today, short and savoury! Sally.

(Do you want to see the squid photo too? Just in case...)

QUICK CALAMARI WITH GARLIC MAYONNAISE

Wednesday 23 October 2013

Plastic Canvas

So, following on from yesterday's post introducing you to my newest, perfect, portable craft...

I came across CraftyPod a couple of weeks ago when I was searching for some help getting to grips with 'watermarking' my photos - there was a very useful post on that, but I still haven't managed to get started with it, I got a bit distracted having a good browse round the rest of the blog!

There are quite a lot of quilting related posts which caught my eye for a start. Diane, who writes the blog, has also just had a quilting book published - Quilting Happiness - and she's recently done several posts on quilting stories she collected that didn't manage to make it into the finished book. And since I've really enjoyed reading the reject bits of the book, I think maybe I'd love the actual book - I have high hopes that it may be winging its way to me as a birthday present from my lovely Mother-in-Law, so I'll let you know!

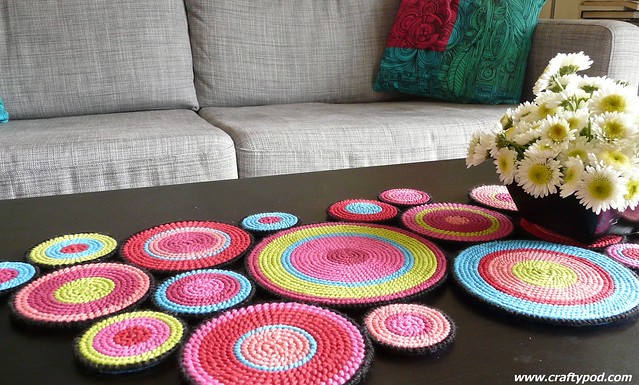
But, as well as the quilting, my eye was very much caught by posts on plastic canvas. Not something I'd seen anything of before, but as soon as I saw these plastic canvas circles in a table runner...


pc-table-runner-finished3-wmtest
Spot the perfect little 'www.craftypod.com' watermark at the bottom of the photo, that's what I need to get started on!

 I knew it was just what I needed to make some circular 'bunting' to hang in my living room. I've been wanting to make something along these lines for ages, to echo the wool 'pennies' that are in my rug and cushions (I'll show you them when I've got the bunting finished too). I wanted something a bit more 'rigid' than just fabric bunting. The only idea I'd had, before coming across the plastic canvas, had been to use circles of wood cut from a tree branch and then painted. I've had the wood cut for a long time, but just couldn't picture it looking quite as I wanted, even painted. But these plastic canvas circles give me exactly the effect I've been wanting. This is where we're up to with our making so far:


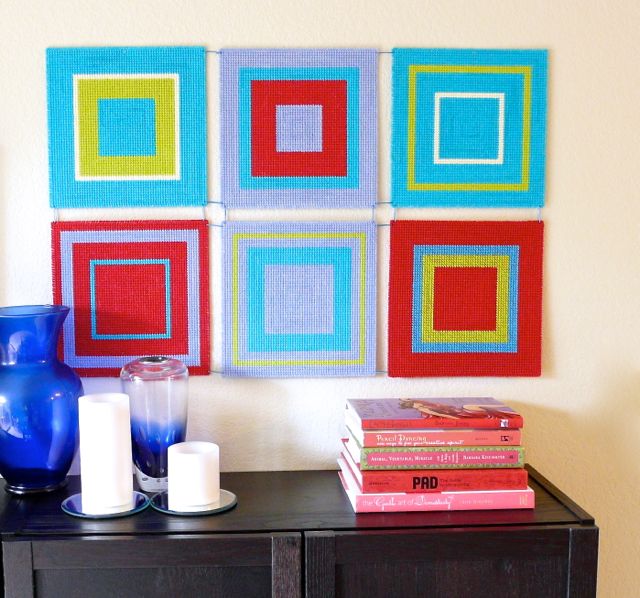
I think I'm going to need nine of them, and since they do take quite a bit of time I'm very glad I've got some enthusiastic helpers in the children! But it's not just circles that you can do. Take a look at another one of Diane's pieces - a beautiful plastic canvas wall hanging

pc-wall-hanging-finished3

(By the way, Diane also has a crafty mum, who has her own blog, with a very handy stitch tutorial here.)

And since starting our own plastic canvas project I've realised that I did actually have something already in the house made from the stuff...


A quaint little cottage - bought in a charity shop (of course!) for next to nothing. Although at the time I didn't appreciate exactly how it was made, it was obvious that someone had lavished a huge amount of time and love on it - exactly the kind of thing I couldn't leave sad and lonely in a shop! I don't know whether you can see from the photo above but it's 3D, the roof was sewn on but I unpicked it so that it's now removeable - not such a strong structure anymore but perfect for lots of play opportunities.

The plastic canvas has been lined with fabric throughout and stitched together to create the structure.

Here are a few more ideas on ways to use it from Pinterest:

How to Make Plastic Canvas Flowers
http://www.pinterest.com/pin/165929567494521789/

Snow Village - created with plastic canvas
http://www.pinterest.com/pin/279082508131346814/

Needlepoint Jewelry by CraftyPod, via Flickr
http://www.pinterest.com/pin/279082508131389416/

Idea for bookcase pendant in plastic canvas
http://www.pinterest.com/pin/279082508131404063/

With Christmas approaching it seems to me to be something with lots of potential for:
  1. Giving as a present to a craft loving child (or grown up!)
  2. Turning into Christmas decorations (you can get precut star shapes for a start)
  3. Using it to make homemade presents - quite possibly getting your children to do the making, something like those bright, colourful pendants for example.
So what do you think? Are you a plastic canvas convert, like me, now?

Back tomorrow, Sally.